Quantcast
Channel: SSIS – MikeDavisSQL
Viewing all 33 articles
Browse latest View live

Setting up SSIS Auditing Part 2

$
0
0

Auditing in SSIS can be a real headache. In this two part series blog I am going to try to make it a little easier. You can also download my white paper and sample files on Auditing SSIS here. You can also see this post and more at SQL University. Part 1 of the blog is here.

SQLUniversity

Creating a Custom Auditing Framework

Creating an auditing solution is time consuming but once built gives you the detailed information you want in your table and allows you to filter unnecessary data. You will create this custom auditing by adding tasks to the Event Handlers of the package.

Event Handlers

There are several event handlers listed under the event handler tab. Click on the event handlers tab at the top of the example package and you will see two drop down menus at the top. On the left there is a drop down with the tasks in the package and the package itself as seen in figure 8. You can create specific auditing for each task if desired. In this example you will create auditing for the entire package, so ensure the package name is selected.

clip_image001

Figure 8

The right drop down menu contains the events available for the package. Select the onError event handler and click the blue link in the center to create the onError event handler. Before you can start auditing you will need to create a table to write the data too. For this example you will be auditing the package name, task name, error description, and the date. Open SSMS and run the following SQL in your auditing database to create the auditing table.

CREATE TABLE [SSISErrorLog](

[RunTime] [datetime] NULL,

[Package] [varchar](500) NULL,

[Task] [varchar](500) NULL,

[Error] [varchar](500) NULL

) ON [PRIMARY]

Execute SQL Task

Now you are ready to insert data into this table. Before we insert data we need to create one more variable. There is a problem with the date format in SSIS. The DateTime format in SQL is different than the System variables in SSIS. The format in SQL is 1900-01-01 00:00:00.000, and the format in SSIS is 1/1/1900 12:00:00 AM. So you will need to convert the SSIS date to the SQL format. To do this, create a variable on the package named strStartTime and set the type to string. Set the variable to evaluate as an expression in the properties of the variable. Click on the expression ellipsis and enter the following code:

(DT_WSTR, 10)(DT_DBDATE)@[System::ContainerStartTime] + ” ” + (DT_WSTR, 8) (DT_DBTIME)@[System::ContainerStartTime]

This is the SSIS Script language. It will convert the start time of the current container to a format SQL will recognize.

Go back to the package onError Event Handler. Drag in an Execute SQL Task. Open this task and set the connection to the testing database. Enter the following SQL into the Execute SQL Task. Notice the convert function used to convert the string value of the date to a datetime for SQL.

INSERT INTO SSISErrorLog

([RunTime]

,[Package]

,[Task]

,[Error])

VALUES(CONVERT(datetime,(?)),?,?,?)

Click on the Parameters tab of the Execute SQL Task and enter the parameters as shown in figure 9 below. Notice the first parameter is the variable you create previously, the rest are system variables. Click ok to close the task and return to the control flow of the package.

clip_image003

Figure 9

You will need to cause an error in the package to have the Event Handler fire. Open the first Execute SQL Task in the For Each Loop and put the letter ‘X’ in front of the SQL command. This will cause a syntax error. Run the package. The package should fail. Open SSMS and query the SSISErrorLog table and you should see the data from the package run as seen in figure 10 below.

clip_image005

Figure 10

If you do not see any data, return to the package and look under the Progress/Execution Results tab and find the error on the event handler. It should tell you why the insert statement failed.

Expressions

This was a simple example of writing data to a table to audit a package. You can use more variables and expressions to make the package more customized. For example you can create some of the variables below and use the corresponding expressions. These variables would be the parameters in the Execute SQL Task instead of the system variables. Of course you would need to alter your table to write these new columns.

VariableName

Variable Type

Expression

strUser

String

@[System::MachineName] + “\\” + @[System::UserName]

strDate

String

(DT_WSTR, 10) (DT_DBDATE) @[System::ContainerStartTime]

strPackageLoc

String

@[System::MachineName]+ “\\”+@[System::PackageName]

strExecBy

String

@[System::InteractiveMode] == true ? @[System::UserName] : @[System::MachineName]

You can see by this small example that creating and maintaining a robust auditing solution will take quite a bit of time. This type of solution would need to be added to every package in your environment that you need to audit. You can use a package as a template and make any adjustments to the auditing as needed during package development.

To avoid this time consuming work, you can use a tool by Pragmatic Works that can do this work for you. That tool is BI xPress.


Monitoring SQL Server with SSIS

$
0
0

SQL Server can be monitoring with SSIS packages using the DMVs in SQL Server. I did a webinar on this and you can watch the video at PragmaticWorks.com under the webinars page.

You can download the code for this webinar here.

I have updated the script. I removed the BIxPress compoents and included the date script. I have tested and it runs great.


Sorting a String as a Number with T-SQL and SSIS

$
0
0

I was working on a Cube in Analysis Services for a client recently and needed to sort on a field that was a varchar but contained numeric data. I wanted to sort as if it was numeric. I could not just convert this code to a number and sort on that, because the codes had multiple decimals as seen in this image below.

image

Notice the numbers are sorted as a string and not numeric. You want the number 1.1.2 to come before 1.1.10. Instead you can see it is lower in the order due to the string order. You will also notice 2.2.0 should be before 2.10.0. This is happening because a string is evaluated as alphabetical when sorted. So the number 10 would come before the number 2. This is because 1 is less than 2. The zero in ten is not even checked because is it alphabetizing when ordering these fields.

To fix this issue you need get the individual numbers between the decimals in the code as integers and sort on each one. To get the first number we simply use a char index to get up to the first decimal with this SQL code. This code it getting the location (CharIndex) of the decimal and then getting the substring up the character before the decimal. Then is it converting it to an Integer.

convert(int,SUBSTRING(code,1, CHARINDEX(‘.’, code) – 1)) as Num1,

Then we need to get the number after the first decimal but stop at the second decimal. This is a little harder as you can tell by the below code. First we get the location of the first decimal plus one to use as the starting point in our substring. The length of the substring takes a little math. It is the length of the code minus the first decimal location minus the index of the last decimal.

convert(int,SUBSTRING(code, CHARINDEX(‘.’, code) + 1, LEN(Code) – CHARINDEX(‘.’, code) – Charindex(‘.’,REVERSE(code)))) as Num2,

Then we need to get the number after the last decimal. The location of the start of the substring is calculated by subtracting the length of the code minus the location of the last decimal place plus 2. The length of the code is used as the length of the substring, this is too long but since it is the last digit it works fine.

Convert(int,SUBSTRING(code, len(code) – Charindex(‘.’,REVERSE(code)) + 2, len(code))) as Num3

The complete Query will be:

Select Code,

convert(int,SUBSTRING(code,1, CHARINDEX(‘.’, code) – 1)) as Num1,

convert(int,SUBSTRING(code, CHARINDEX(‘.’, code) + 1, LEN(Code) – CHARINDEX(‘.’, code) – Charindex(‘.’,REVERSE(code)))) as Num2,

Convert(int,SUBSTRING(code, len(code) – Charindex(‘.’,REVERSE(code)) + 2, len(code))) as Num3

from CodeOrder

Order by Num1, Num2, num3

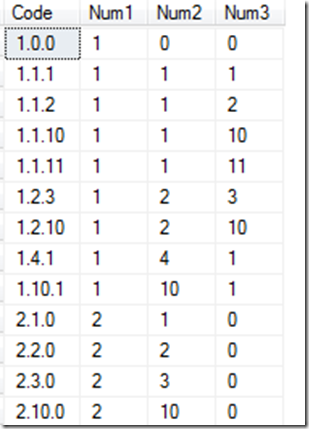
And the results of this query are:

image

You can see that the codes are in the numerical order we wanted. Your SQL code may need to be adjusted for the number of decimals in your field.

You can add these new columns to your dimension and use them as the key to your attributes and order by the key. You can change the dimension table in the DSV to a Named Query and add these new number fields.

If you prefer, you can go back to the SSIS package loading this dimension and create these new number columns on the dimension table. In SSIS the derived column transform could be used to do the same conversion that I am doing in the Named Query to get the numeric fields.

Which is better, SSIS or SQL? Should you do this in derived columns in your package or should you use SQL statements like the one above to perform this work?

Maintainability and Performance are the two items to consider when making this decision. The SQL Query will perform much better than the derived columns but the query could confuse others that may need to maintain this after you. The SSIS derived column tends to be a little easier to understand and managing one derived column in an SSIS package could be considered easier. This is debatable and I know hard core T-SQL Gurus are going to disagree.

Here is the derived column that does the same thing as the SQL statement above.

image

(DT_I4)SUBSTRING(Code,1,FINDSTRING(Code,”.”,1) – 1)

(DT_I4)SUBSTRING(Code,FINDSTRING(Code,”.”,1) + 1,FINDSTRING(Code,”.”,2) – FINDSTRING(Code,”.”,1) – 1)

(DT_I4)SUBSTRING(Code,FINDSTRING(Code,”.”,2) + 1,LEN(Code))

The FINDSTRING function allows you to select the occurrence you want to find so there is no need for the reverse and the extra subtraction that was needed in the SQL query.

The results are the same and these columns can now be added to the dimension table and be used to sort. The SQL statement did perform 20% faster than the derived column. But the Derived column could be considered easier to maintain depending on your level of T-SQL and your level of SSIS.

Also, as pointed out in the comments, you can use ParseName too.

SELECT code, 
Cast(PARSENAME(code, 3)as int) as Num1, 
cast(PARSENAME(code, 2) as int) as Num2, 
cast(PARSENAME(code, 1) as int) as Num3 
FROM CodeOrder
Order by Num1, Num2, num3

Execute Multiple 2008/2005 SSIS Packages with a T-SQL

$
0
0

If you want to execute a set of SSIS packages in SQL Server 2008 or 2005, you can do this using T-SQL. First you will  need a table with all of your package names on it. Then a While loop to execute each package.

Here is the example code:

Declare @FilePath varchar(2000)

Declare @cmd varchar(2000)

DECLARE @package_name varchar(200)

Declare @PackageCount int

Declare @X int

Set @X = 1

Set @PackageCount = (Select COUNT(*) from Packages)

set @FilePath = ‘C:\Package Path\’

While (@X <= @PackageCount)
Begin

With PackageList as
(
Select PackageName, Row_Number() Over(Order by PackageName) as  Rownum
From Packages
)
SELECT @package_name = PackageName
FROM PackageList
Where Rownum = @X

select @cmd = ‘DTExec /F “‘ + @FilePath + @Package_name + ‘”‘

print @cmd

Set @X = @X + 1

exec master..xp_cmdshell @cmd

End

In the new version of SSIS 2012 you will be able to launch packages with T-SQL Natively.


SSIS 2012 Copy or Duplicate Environments

$
0
0

In SSIS 2012 there is a great new feature called environments. They can be thought of as a collection of parameters or variables. One of the questions I get asked when teaching SSIS 2012 is “Can I duplicate an environment?”. There is a move feature already included. But this moves the environment instead of copying.

image

Now you can write T-SQL Scripts like the one at the bottom of this blog to create an environment and create the variables in the environment, but this is time consuming. You can script this out when you first create the environment and the variables. But if you have an already existing environment then this is not possible.

So how do you copy an environments? Here is a little trick to use.

First, to create the new Environment, right click on the new folder and select create environment. This is the easy part. The hard part is getting all of the variables inserted. You may have 50 variables in the previous environment to copy over. We need an easy way to copy them all over to the new environment.

Next, right click on the new environment and select properties. Take note of the environment identifier. Do the same for the previous environment.

image

Next, go to the SSISDB and take a look at the internal.environment_references table and find the Environment ID’s. The Environment identifier comes from internal.environment_references table. Then go to the [SSISDB].[internal].[environment_variables] table. This table contains all of the variables in your environments. You will find the rows for the previous environment for each variable in that environment. Look for the previous environment id you just noted.

image

Now we need to write a T-SQL statement to duplicate these rows with the new environment ID. This is a simple Insert into statement followed by a select statement. You will need to add in the Select statement a hard coded value of the new environment ID in the columns and a where clause looking for the previous environment id.

INSERT INTO [internal].[environment_variables]
([environment_id]
,[name]
,[description]
,[type]
,[sensitive]
,[value]
,[sensitive_value]
,[base_data_type])
SELECT  10 as environment_id  –New Environment ID
,[name]
,[description]
,[type]
,[sensitive]
,[value]
,[sensitive_value]
,[base_data_type]
FROM [SSISDB].[internal].[environment_variables]
where environment_id = 9  –Previous Environment ID

Make sure you create the new environment first and get the id’s correct in this script and you should be all set.

Also…

Here is the T-SQL code that can be scripted out when you first create an environment and the variables in it. But this can only be done when you first create them. The above solution works on any existing environments.

EXEC [SSISDB].[catalog].[create_environment] @environment_name=N’Test’, @environment_description=N”, @folder_name=N’SSISDemo’

GO

DECLARE @var sql_variant = N’test’
EXEC [SSISDB].[catalog].[create_environment_variable] @variable_name=N’test’, @sensitive=False, @description=N”, @environment_name=N’Test’, @folder_name=N’SSISDemo’, @value=@var, @data_type=N’String’
GO

DECLARE @var sql_variant = N’test1′
EXEC [SSISDB].[catalog].[create_environment_variable] @variable_name=N’test1′, @sensitive=False, @description=N”, @environment_name=N’Test’, @folder_name=N’SSISDemo’, @value=@var, @data_type=N’String’
GO

DECLARE @var sql_variant = N’test3′
EXEC [SSISDB].[catalog].[create_environment_variable] @variable_name=N’test3′, @sensitive=False, @description=N”, @environment_name=N’Test’, @folder_name=N’SSISDemo’, @value=@var, @data_type=N’String’
GO


IT Pro Camp Jacksonville 2012

$
0
0

I spoke last weekend (6/16/2012) at the first ever IT Pro Camp in Jacksonville Florida. It was a great event with over 100 people attending. Breakfast and Lunch was provided with a great after event at Tilted Kilt.

One of the great sessions I attended, besides my own Smile, was Jose Chinchilla. He did a great job showing the new T-SQL features in SQL Server 2012. My session was on the new features in SSIS in SQL Server 2012.

Over all it was a great event and Blain Barton (Blog) from Microsoft did a great job. I look forward to next years event.


Studying and Learning Business Intelligence

$
0
0

I have been doing interviews for Pragmatic works for the past few years and I have come across quite a few people who wanted to be hired as a senior BI consultant and their skills were just not up to the level of a senior consultant. It seems they work in an environment that corners them into doing things a certain way and not giving the opportunity to grow pass their defined role. So I put together a list of study items to help people ramp up in BI skills.

Here are some suggested books:

BI:

http://www.amazon.com/Knights-Microsoft-Business-Intelligence-24-Hour/dp/0470889632/ref=sr_1_1?s=books&ie=UTF8&qid=1349185599&sr=1-1&keywords=business+intelligence+24+hours

SSIS:

http://www.amazon.com/Knights-Microsoft-Integration-Services-24-Hour/dp/1118479580/ref=sr_1_8?ie=UTF8&qid=1349185567&sr=8-8&keywords=ssis+2012

http://www.amazon.com/Professional-Microsoft-Server-Integration-Services/dp/111810112X/ref=sr_1_1?ie=UTF8&qid=1349122074&sr=8-1&keywords=ssis+2012

SSRS:

http://www.amazon.com/Professional-Microsoft-Server-Reporting-Services/dp/1118101111/ref=sr_1_1?ie=UTF8&qid=1349122094&sr=8-1&keywords=ssrs+professional

SSAS:

http://www.amazon.com/Expert-Development-Microsoft-Analysis-Services/dp/1847197221/ref=sr_1_3?s=books&ie=UTF8&qid=1349122111&sr=1-3&keywords=ssas+professional

For Data modeling:

http://www.amazon.com/The-Data-Warehouse-Toolkit-Dimensional/dp/0471200247/ref=sr_1_1?ie=UTF8&qid=1349122258&sr=8-1&keywords=data+warehouse+toolkit

You may also want to consider getting certified in business intelligence

http://www.bidn.com/blogs/MikeDavis/ssis/369/microsoft-business-intelligence-certification-70-448-ssis-ssas-ssrs

http://www.bidn.com/blogs/MikeDavis/ssis/881/microsoft-business-intelligence-certification-pro-test-70-452

I would also suggest you get involved with the SQL community by attending and speaking at your local user groups and SQL Saturdays, and start blogging to get your name out there.

http://www.sqlpass.org/

I would also suggest following these blogs and reading them weekly to keep up with the newest information.

SSIS:

http://sqlblog.com/blogs/jamie_thomson/

http://blogs.msdn.com/b/mattm/

SSAS:

http://cwebbbi.wordpress.com/

http://sqlblog.com/blogs/alberto_ferrari/

SSRS:

http://blogs.msdn.com/b/robertbruckner/

http://blogs.msdn.com/b/sqlrsteamblog/

http://blogs.msdn.com/b/bobmeyers/

Attend the free webinars available at :

http://pragmaticworks.com/LearningCenter.aspx

If you are a senior BI developer and you have other suggestions please leave a comment to help out those still growing.

Good luck in your studies.

Brad Ball Published a blog on how to ramp up in the DBA world her http://www.sqlballs.com/2012/10/dba-study-guide.html


Bulk Insert Task SSIS – Path Specified Cannot be Found or File Does Not Exist

$
0
0

When using the Bulk insert task in SSIS, you might encounter an error stating that The File Does Not Exist or The Path Specified Cannot be Found. This is usually due to the fact that the file must be on the same server as the database. In other words, it you are connecting to a remote machine the flat file must be on the remote machine. The connection to this file in the SSIS package must use a UNC path and not a mapped drive.

clip_image002


AS400 Program from SSIS

$
0
0

If you need to call an AS 400 program from an SSIS package this can easily be accomplished with an Execute SQL Task. This can be made even easier with two variables and an expression too. The AS400 program QCMDEXC is usually called using the CALL QSYS.QCMDEXC command. This is then followed by a command like CLRPFM FILE(MDAVIS/APPLSQL). Then this is followed by a ten digit string of numbers that contain the number of characters in the command. Then a period followed by five more zeros.

So the complete above command would be:

{CALL QSYS.QCMDEXC (‘CLRPFM FILE(MDAVIS/APPLSQL)’, 0000000026.00000)}

This can be typed into the Execute SQL Command or typed into a variable. But wouldn’t it be nice if the numbers after the command would automatically generate? With a small expression we can make that happen.

Here are the two variables I created on my SSIS package:

strAS400CMD – String variable for the command

strAS400FullCMD – String variable evaluated as an expression to complete the command

clip_image002

The variable strAS400CMD holds the value of “CLRPFM FILE(MDAVIS/APPLSQL)”.

The variable strAS400FullCMD holds the expression

“{CALL QSYS.QCMDEXC (‘” + @[User::strAS400CMD] + “‘, “+

Right(“0000000000″ + (DT_WSTR, 10) (Len( @[User::strAS400CMD])) ,10)+”.00000)}”

clip_image004

This expression will automatically calculate the length of the string for the command variable and create the number string needed afterwards. In the Execute SQL task set the SQL Source Type to variable and select the strAS400FullCMD variable.

clip_image006


Pivoting weird data in SSIS – Sort of…

$
0
0

Sometimes we get data in some bad forms. For example look at the below table:

clip_image001

The names and the amounts are comma separated in two different columns. Let’s imagine we need to get this data into a table like the one below:

clip_image002

Notice the column names are the names that were in the data. This can be accomplished with derived columns and conditional splits in an SSIS data flow.

Here is an example of a data flow that accomplishes this:

clip_image004

After the source the first component is the conditional split.

clip_image006

The conditional split sends the rows down different paths based on the number of commas in the data. This makes the derived columns afterwards much easier to handle. If not then we would have to nest a bunch of conditional statements in the derived columns.

The next steps are the derived columns. These will do different work based on the number of commas in the data.

With only one name in the data:

clip_image007

Two Names:

clip_image009

Three Names:

clip_image011

Four Names:

clip_image013

In these derived columns you are taking the items between the columns and separating them into their own columns. Here is a data viewer showing the data after the union all.

clip_image015

In the next step I decided to get rid of the nulls so the last derived column would be easier to write. If you want to leave in the null you can, but then the last derived columns will need to have a lot of ISNULL checks.

clip_image016

Now that the nulls are gone, and you have everything divided into individual columns, you can use one more derived column to arrange the data into the correct columns.

clip_image018

And now the mapping to the destination table should be easy. The ID column is mapped to ID and the names are mapped to their correct columns.

clip_image019

This method will work if you have a limited number of columns. The maintenance on this would be a headache if you have to add or remove names frequently. I would not suggest this method if you have frequent column changes.


Environment Variables in SSIS Packages and Configuration Tables

$
0
0

Configuration tables are a best practice in just about any SSIS environment. They make it easy to update multiple packages from a single change. But one of the issues with configuration tables is the location of the server is different on each server. You may have a Server name of Dev on your development server and a Server name of Prod on the production server. This has to be updated in the package before the package can be moved to the new server. If you have several configuration tables then you have to update several files. This can be time consuming and tedious. Environment variables can take away this work and make the transfer from server to server easy.

Environment variables can hold the name of the server on each server. In the Configuration Manger you place in the name of the Environment Variable. The Environment Variable does not hold the value of the variable or connection that is passed to the package. The environment variable holds the name of the server. This value tells the package where to look for the configuration table and reads the configuration table for the configured values to pass into the package.

You can think of the Environment Variables as pointers for the package. When you move a package to another server it will look for an Environment Variable. It does not matter on which server your package is running. As long as the server has an Environment Variable named the proper name and it contains the name of the proper server, the package will run properly.

You will now walkthrough a small example of building a package with a configuration table and with environment variables.

1. Open BIDS (Business Intelligence Development Studio)

2. Click File>New>Project

3. Select Integration Services Project

4. Named the Project Environment Test

5. Click OK

6. Right Click on the SSIS Packages Folder and click New SSIS Package

7. Change the Name of the Package to EnvironmentVar

8. Click yes to change package object as well

9. Right Click on the Control Flow of the package and select Variables

10. Create a String Variable name strServerName

11. Set the Value of the strServerName to “Localhost” (You local server name)

image

12. Close the Variable Window

13. Drag in a script task to the Control Flow

14. Double Click on the Script Task to open the Editor

15. Set the Read only Variables property to strServerName

16. Click Edit Script (Design Script in SQL 2005)

17. Replace the “Add your code here” comment with the following VB code

MsgBox(Dts.Variables(“strServerName”).Value)

(This will cause a message box to appear showing the value of the variable)

18. Save and Close the Script Editor

19. Click Ok in the Script Task Editor

20. Debug the Package

21. A Popup with the word “Development” will appear

image

22. Click OK in the popup box

23. Stop the package from debugging

Now you will create a two set of configuration files on your local machine. You will need to have two folder locations from which you can read and write. I have created two locations on my machine: C:\ConfigQA and C:\ConfigProd. These would represent the QA and Production machine on different servers. In your business environment you may have mapped drive or UNC paths on different servers. We also need to create an Environment Variable on your local machine. Each operating system is different on how to get to the Environment Variable Screen. The following are the instructions for Windows 7. Open the Control Panel, click on System and Security, click System, click Advanced System Settings, click on the advanced tab, and click the Environment Variables Button.

image

24. Create a New Environment Variable called ConfigLocation

25. Set the Value to C:\ConfigQA

26. Click Ok and return to BIDS

image

27. Right Click in the Control Flow and Select Package Configurations

28. Place a check next to Enable Package Configurations

29. Click Add

30. Click Next (If the Welcome window Appears)

31. Leave the Configuration Type to XML Configuration File

32. Place a dot in the Radio Button next to “Configuration Location is stored in an Environment Variable”

33. Select the ConfigLocation Environment Variable(You may need to restart BIDS for it to Show)

34. Click Next Finish and Close

35. Click


Execute SSIS Packages with a Macro in BIDS

$
0
0

When running SSIS packages in BIDS it is common to click on the green arrow at the top of BIDS to run a package.

clip_image001

One problem that can occur when using this button is the deployment of project and the creation of the deployment manifest file. If you have turned on deployment for the project under the Project Properties then this green arrow will now run the package and deploy.

clip_image002

To avoid this issue you can right click on the package in the solution explorer which will only execute the package.

clip_image003

This is inconvenient for me, because I place the solution explorer behind the properties window. I do this because there are a lot of properties and it is easier to find the properties I am looking for when the properties window is stretched out.

clip_image004

To give you the ability to launch a package from the toolbar without deploying you can create a macro. It is very simple and only takes a minute to create it.

1. At the tops of BIDS click on View > Other Windows > Macro Explorer

clip_image005

2. In the Macro Window right click on Module1 > New Macro

3. Change the Sub Name to ExecutePackage()

4. Enter the following Code:

DTE.ExecuteCommand(“ProjectandSolutionContextMenus.Item.ExecutePackage”)

clip_image007

5. Save and Close the Macro Editor

6. Close the Macro Explorer

Now you have created the Macro that will execute a package. The next step is to add it to the toolbar.

1. Click on the toolbar drop down menu at the end of the toolbar where you want to add the macro and select Add or Remove Buttons > Customize

clip_image008

2. Click on the Commands Tab and select Macros from the Categories list

clip_image009

3. Drag the Execute Package Macro onto the toolbar where you want the button to appear

4. Right click on the new button and select Change Button Image, Select the image of your choice

clip_image010

5. Right Click on the new image in the toolbar and select Text Only in Menus.

Now you should have a new button on the toolbar. This macro button will launch the package that is currently focused on in BIDS.

clip_image011

You cannot use this button if you already have a package running in debug mode. You will see an error if you do this.clip_image012


Handling Large Many to Many bridge tables

$
0
0

In some scenarios you will need to create a many to many relationship in your cube in SSAS. One of the problems that arise from many to many bridge tables are the size of these tables. In this example we have a fact table that contains the history of a person and measures for that person at a bi weekly basis. Each person can be in a Program. Each person can be in more than one program at a time also. We have thousands of people so the fact table contains about 8 million rows.

Typically a bridge table will have a surrogate key for the dimension and a surrogate key to the fact table or a degenerate dimension based on the fact table. The key on the fact table in this case is the person id and the date key. So to create a many to many based on this key would be 8 million rows times the number of programs a person is in. There are over 300 programs, and some people are in as many as 6 programs at one time. This would make the bridge table over 24 million rows. This would also hurt performance quite a bit. I will admit that in some situation this type of bridge table cannot be avoided, but not here.

To create a bridge table that is much smaller all we need are all of the program combination that occur in our source data and come up with a unique key for each of those combinations.

The first step in this process is to look though the source data and determine all of the program combination. Each person has an program open date and close date. The fact table is at a bi weekly granularity, so we will check the programs at the same granularity.

Here you see an SSIS package that will loop through each date in the past bi-weekly and determine which programs people were in at that time. This package is loading all history. If you are running your package on a nightly basis then you will only need to check the current date after this history is loaded.

image

Here is the data flow in this package.

image

The query to get the programs is below, The date is hard coded here but this would be either getdate() or a variable for the loop getting history.

With Programs as (

Select Distinct f.DimDWPersonKey, f.DimProgramKey

From FactSAMISPerson f

Where f.DimDWPersonKey > 0 and

f.EpisodeOpenDate <= ’2007-01-01′ and

isnull(f.EpisodeCloseDate,’9999-01-01′) > ’2007-01-01′)

Select ‘a’ + convert(varchar(3),ROW_NUMBER() Over(partition by DimDWPersonKey Order by p.DimProgramKey)) RowNum,

p.DimDWPersonKey, p.DimProgramKey

from Programs p

Order by p.DimDWPersonKey, p.DimProgramKey

The pivot transform pivots on the person id. If you need to know how to use the pivot transform check out this article. So the incoming data looks like the following image:

image

The data after the pivot will look like the following image. Notice there is a person with two programs.

image

The reason for having 20 columns is to handle any situation where a person is in up to 20 programs at one time. This is way over kill because the highest in our data is 6 programs at a time. But you want to ensure that you can handle increases in the future.

The aggregate groups on all 20 program columns to eliminate duplicates. We do not need the person Id any more at this point so it is dropped. The lookup check the program combo table for duplicates. This ensures a unique id for each program combination and no repeats. Here is the program combo table.

image

Now every existing program combination is on this table and it has a unique id. The next step is to load the fact table and do a look up on this table to get the unique id. This is done using the same query above to load the program combo. Now you just need to do it for each person for each date you are loading in to the fact table. In the image below you can see this part of the fact table load. It works just like the package above, but this time is mapped to the incoming person id writing to the fact table. The lookup then gets the unique id by comparing all 20 columns in the query to all 20 columns on the program combo table.

image

The last step is to pivot the program combo table to create the bridge table. Here is the view used to do that.

SELECT ProgramComboID, ProgramSK

FROM (Select ProgramComboID, a1, a2, a3, a4, a5, a6, a7, a8, a9, a10, a11, a12, a13, a14, a15, a16, a17, a18, a19, a20 from ProgramCombos) as p

Unpivot (ProgramSK for id in (a1, a2, a3, a4, a5, a6, a7, a8, a9, a10, a11, a12, a13, a14, a15, a16, a17, a18, a19, a20 )) as s

Here are the results of that query.

image

Now you can add this view as the bridge table in your DSV for SSAS and create the relationships. This made the bridge table only 7404 rows. Much better than the 24 million we would have done with a traditional bridge table load.


Loop Through Excel Files in SSIS

$
0
0

You can loop through excel files using SSIS. This will use the For Each Loop container and a data flow task.

clip_image002

First Create a variable named strExcelfile as a string variable; you can leave the value blank.

clip_image004

Next, drag in a For Each Loop. Set it to For Each File, and point it to the folder where the excel files exist and type .xls or .xlsx for the file type. In this example the excel files are in c:\test\excelfiles. There are three files named USCustomers1.xls, USCustomers2.xls, and USCustomers3.xls.

clip_image006

Next, drag in a data flow task and drop it in the loop container. Open the Data flow and drag in an Excel Source. Set the Source to one of the excel files in the folder above. This will set the column names and the metadata for the files. Each file in the loop must have the same lay out. If they have different column widths are data types then you cannot use this technique.

Now you will map the excel file to the connection. Click on the Excel connection in the connection manager. This was created when you created the Excel source in the Data Flow. Click on Expressions in the properties windows and open the expressions editor for the Excel connection manager. Select the File Path property and drag in the strExcelFile variable.

clip_image008

One Last step is to set the data flow to delay validation. This is so the data flow will not check for the excel file until after the file name is loaded into the variable.

clip_image010


SSIS Records on the Same Row – kind of like pivot

$
0
0

If you have two or more records on the same row, and need to write each record on its own row in a destination, you have two choices. You can do this in series or parallel in a single data flow in SSIS. Here is the input table I am using for my example.

clip_image002

Notice I have three names on one row. I need these to be inserted into a table with a first name and last name column only. So all three first name fields need to be mapped to the only first name columns on the destination and the same is true for the last name column.

The first method I will show is using a multicast and a union all as seen below.

clip_image004

The multicast clones the data into three data flow line. In the union all we will now select the first name and last name columns to union together. We are going to stack them as shown and delete the unused columns. This gives us only two columns out of the union all.

clip_image006

This makes the mapping in the destination easy. It is simply two columns to two columns.

clip_image008

The second method is to spilt the data up and write it to the database in parallel. Here is that data flow.

clip_image010

This will write the data to the data base for each customer in a separate destination.

Name 1 Destination mapping.

clip_image012

Name 2 Destination mapping

clip_image014

Name 3 Destination mapping

clip_image016

Here is the data on the destination table after the load. Notice the names are all on individual rows.

clip_image018

In terms of performance, the parallel load works about twice as fast. This is in part due to the union all being a partially blocking transform and the parallel is writing three fields at once. This is a huge performance hit. If the parallel load time is 5 minutes, then the series load time would be about 10 minutes. This may seem small, but scalability should always be considered.


SSIS Pivot on bad data

$
0
0

The pivot transform in SSIS is already a pain to use. When you have bad data it makes it even worse. In this blog I am going to show how to handle bad data when using the pivot transform. You should understand how to use the pivot transform already and Devin Knight has a great blog on how to do that here.

Here is the input table:

image

The output table should look like so:

image

This is a situation where the users have entered data and they have left off the types on the input table and therefore we do not know where the value should go. These values will be dropped in this example. When loading the output table we need to pivot the data. Another issue is the IDs of the incoming data are sequential and not matching. So IDs 1-5 are the first row, 6-10 are the second row and so on.

Here is the data flow used to perform all of this work.

image

All of these issues can be handled in SSIS with native task. We will use an aggregate transform in this example. Remember an aggregate transform is an Asynchronous transform and does not perform well if you have a lot of rows. This aggregation could be done with a staging table if that is the case.

Here is the query used to pull the information from the input table:

SELECT ID, isnull(Type,’X') as Type, [Value]

FROM dbo.PivotInput

This will give us the following table:

image

In the pivot transform you can create a column to catch all of the X columns. These are the rows missing the type.

image

After the pivot transform the data will look like the below image in a data viewer:

image

Here you can see that the data has been pivoted but the ID issue still needs to be resolved. You need to place ID 1-5 on the same row and 6-10 on the same row and make this work for all numbers. You will do this with a derived column and the aggregate transform.

The next transform is the derived column. Here you will create a new ID column with the following expression:

image

Now after the derived column the data will look like the below image:

image

Notice now you have a New ID that can be grouped together. The aggregate transform will do this.

Here is how the aggregate transform is set up:

image

Notice you are dropping the X column. You could do a multi cast before this to map those bad rows to another output like a flat file for someone to examine manually.

After all of this we map it to the output and the table looks like so:

Let me know if you have any weird situations like this. I always love a good challenge.


SSIS Execute SQL error – No disconnected record set is available

$
0
0

If you get the error in SSIS that says:

…failed with the following error: “No disconnected record set is available for the specified SQL statement.”. Possible failure reasons: Problems with the query, “ResultSet” property not set correctly, parameters not set correctly, or connection not established correctly.

This is can be due to the record set in an Execute SQL task being set to the wrong result set and the task not returning a dataset. For example, if the Execute SQL task is executing an insert statement, there is no returned dataset. But keep in mind that the insert statement does run and will write the data to the table. In this case the record set should be none.

clip_image002


SSIS For Loop Skip Files

$
0
0

When running a For Each Loop through a set of files, sometimes you will have specific files that you do not want to load.

For example, I have a set of files named:

Abc.txt
Mno.txt
Rts.txt
Wln.txt
Xyz.txt

If I want to skip the file that starts with “W” then I will need an expression in my For Each Loop to detect this file.

Inside the For Each loop I am going to place a sequence container. This will give me a place to anchor my expression which I will place on the precedence constraint coming from the sequence container. There are no tasks in the sequence container.

clip_image002

On the precedence constraint line I am going to set it to constraint and expression. The expression will be:

substring(Upper(@strFileName),1,1) != “W”

clip_image004

This is looking at the first letter in the filename and comparing it to the letter “W”. I would place the “W” in a variable and use that instead, I am just showing this way for simplicity. Notice I convert the file name variable to upper case and compare it to an uppercase “W”. That way the case will not matter.


SSIS – Using Kill with SP_Who to Break locks

$
0
0

clip_image001

The dreaded table lock can occur and cause your SSIS packages to fail. A popular request I receive asks “How can I get rid of these table locks?” This blog will show you how to build a package that will kill any SPID’s that are running on your system that could be locking a table.

Note: Be careful using this technique, you could kill a critical process.

In this package you will have five variables.

clip_image002

objSpids = Holds the data from sp_Who2

strDatabase = Name of the database to look in Spids

strSpid = Current Spid in the for each loop

strSQLKill = Expression: “Kill ” + @[User::strSpid]

strSQLSPWho = Expression

“CREATE TABLE #sp_who2

(SPID INT,

Status VARCHAR(1000) NULL,

Login SYSNAME NULL,

HostName SYSNAME NULL,

BlkBy SYSNAME NULL,

DBName SYSNAME NULL,

Command VARCHAR(1000) NULL,

CPUTime INT NULL,

DiskIO INT NULL,

LastBatch VARCHAR(1000) NULL,

ProgramName VARCHAR(1000) NULL,

SPID2 INT,

REQUESTID int

)

INSERT INTO #sp_who2

EXEC sp_who2

SELECT cast(spid as varchar(10)) as spid

FROM #sp_who2

WHERE DBName = ‘”+ @[User::strDataBase] +”‘

and HostName is not null

and Status <> ‘BACKGROUND’

group by spid

DROP TABLE #sp_who2″

Notice the strSQLSPWho variable holds the query to create the table and put all of the SP_Who data into it. The database name comes from the strDatabase variable.

The first thing you will need to do is get the information from SP_who. This is done with an Execute SQL task. Set the SQL source type to variable and choose the strSQLSPWho variable as the source variable. Set the Results set to Full Results Set. In the Results set pane add a result set and set the name to 0 and the variable to objSpids.

clip_image003

clip_image004

Now you will need to loop through each row in the object variable with the Spids. The For Each Loop will do this. The Enumerator needs to be set to For Each ADO. Select the objSpids variable. Under variable mappings set the variable to strSpid and the index to 0.

clip_image005

clip_image006

Now drop an Execute SQL task in the For Each Loop. Set the SQL source type to variable and choose the strSQLKill variable as the source variable. Leave the Results set to None.

clip_image007

That is it for building the package. The next step is to test the package. Place a breakpoint on the For Each loop. Set this breakpoint to “Break at the beginning of every iteration of the loop”.

clip_image008

Start debugging the package and check the watch window or the locals window to for the value of the variables. To get these windows click on debug >Windows> Locals or Watch1.

clip_image010

Here is the watch window:

clip_image011

If the package is picking up Spids you don’t want you will need to adjust the where clause in strSPWho variable.


Using Configuration Files in SSIS

$
0
0

Now in SQL 2012 we have parameters that make it easy, but configuration files are still an option and I still see a lot of my clients using them even on 2012 due to several reasons, but mostly because of the work to convert over.

SSIS packages are great ETL tools and can do just about anything you need in terms of ETL. Most organizations start out creating SSIS package one by one until they have dozens, hundreds, or even thousands of packages. I have worked with one client that ran over 4,000 packages. This can be a nightmare to maintain. You can save yourself a lot of work by deciding upfront how to configure your packages using configuration files or tables. We are going to discuss configuration files in this article.

We are going to look at a simple example of passing information to a package with a configuration file. Then we will go over using configuration files on multiple packages. Imagine running dozens of packages that point to a server and the server name changes. If you have a configuration file that is feeding this server name to every package you can make a single change to the configuration file and all the packages are updated. This can reduce your maintenance time significantly.

Here is a simple package example:

1. Drag in a script task into a blank SSIS package.

2. Create a string variable on the package named strData

3. Set the value of the variable to “Package”

4. Double click on the script task.

5. Add the strData variable to the read only variables.

6. Click Edit Script

7. Under the main function add the code MsgBox(Dts.Variables(“strData”).Value)

8. Click save and then close the window

9. Close the script editor by clicking ok

10. Run the package

clip_image002

When you run the package a popup box appears show the work Package. This is the value of the variable saved in the package. Now we will set up a configuration file on the package to give us the ability to change the value of the variable from outside the package.

1. Close the popup box and stop the package.

2. Right click in the control flow and select Package Configurations.

3. Place a check in Enable Package Configurations.

4. Click Add.

5. Click Next in the in the welcome screen if it appears.

6. Click on browse and select a location you have rights to write to.

7. Name the file FirstConfig

8. Click save and then click next

9. Click the plus next to variables >strData > Properties

10. Place a check next to value, notice the value on the right

11. Click Next > Finish > Close

clip_image004

We now have a configuration file on the package but the value is still the value from the package. Now we will open the configuration file and change the value. The configuration file is an XML file and I like to use XML notepad (Free from Microsoft) to open it. You will look for the configured value in this file. This configured value is the value passed to the package.

1. Open the folder containing the configuration file

2. Open the configuration file by right clicking and select open with

3. Select a program you can use to edit the file (Example: Notepad, Wordpad, XML notepad)

4. Check the configured value from Package to Config

5. Save and Close the File

6. Return to the package and run it

clip_image006

You should see a popup showing Config. This is the value from the configuration file. The value saved in the package is overwritten at run time.

clip_image008

This is just one small example of using configuration files. A popular way to use configuration files is on connections. When you have a connection on a package the properties of this connection show in the configuration manager. You can place a check next to the connection string property or you can place a check next to the individual elements that make up the connection string, initial catalog, server name, user name, and password. The user name and password are not needed when using windows authentication.

clip_image010

The password is not stored in the configuration file automatically even if you select it in the configuration manager. This is done by design for security. Microsoft did not want you saving your configuration file in plain text without knowing it. So you will have to open the configuration file and add the password. If you selected the connection string the password will go right after the user name. You must type in “Password =####;”, (#### Represents your password). Don’t forget the semicolon after the password. Now this configuration file can be used in any other package using this connection.

There is an issue when using a configuration file in multiple packages. The package that is using the configuration files will try to load every connection in the configuration file. It the package does not contain that connection it will fail validation and the package will not run. This causes an issue when trying to share a configuration file with many packages. There are three methods for handling these issues. You can create a configuration file for each package or create a configuration file for each connection or a combination of both.

The first method of a configuration file for each package works well if you do not have a lot of packages. If you have a thousand connections and fifty packages, a per-package solution is the obvious choice. If every package has a different set of connections this is almost necessary.

The second method of a configuration file for each connection works well if you have a lot of packages and fewer connections. If you have fifty connection and a thousand packages it will be much easier to maintain a per connection solution. In this situation a package with ten connections would have ten configuration files, each with one connection.

The third option is to combine the first two options in some form. For example, if you have one connection that is used by every package use this configuration file in every package. The other connections can have a package level configuration file. This is harder to maintain and you need document which packages are using which configuration files.

With all the options of configuration files it is important to plan out how you will use them in your environment before you create thousands of packages and create a maintenance nightmare. Planning your SSIS package configuration architecture is important and should not be over looked. It is easy to put it off when you only have a couple of packages. Most environments have their packages grow in number faster than anticipated. Planning your configuration files will save you a huge retro fit project in the future.


Viewing all 33 articles
Browse latest View live